If you have a 2-year-old you understand Mickey and Minnie as a regular household name (or word of demand whenever the TV is on or you're in the store from your little one). I'm still blown away that Gracie at 1 1/2 - 2 years old could point out a mickey logo/silhouette antannae ball from 20 cars away in any given parking lot... by the time she was 1 1/2 it was determined Minnie would be the perfect thing for our little mousketeer! That being said, the planning commenced...
As always I got various ideas online for the party and "pinned" away (not sure if the link will work but it's worth a shot)
before I could get the invite out, I needed pictures... I love using the kids own pictures if at all possible.
Outfit:
- ears & bow (worked out great because they ended up party favors... see later).
- I ordered the headbands (plastic black headbands), various color polka dot gross grain ribbon (two sizes for each color, I think 1 or 3/4" wide for the actual bow and I believe 1.2" for the part that pulls the bow in the middle and to cover the alligator clips) and silver alligator clips from www.trimweaver.com.
- I bought black felt by the yard and hot glue from Joann's and used this template to make the ears http://disney.go.com/disneyjunior/crafts/character-crafts/mickey-and-minnie-ears-1823437
- clothes
- materials:
- regular white t-shirt onesie pack (just need one)
- both sizes gross grain ribbon in red/white polka dot
- black fabric
- mickey silhoutte template (I used my cricut cartridge to create one) I used this cartridge for pretty much EVERYTHING at the party http://www.cricut.com/Shopping/detail--Disney-Mickey-and-Friends-Cricut-Cartridge-0-122.aspx
- red/white polka dot fabric and "2" template (I used my cricut again)
- tutu (I bought this one at gymboree as part of the ladybug collection) but there are plenty of tutu tutorials online (you could use fabric glue and the smaller red/white polka dot grossgrain ribbon to line the tutu)
- double sided iron-on interfacing for the applicae
- I used the mickey template over the black fabric to trace and cut the mickey, repeat on the double interfacing. follow interfacing instructions to iron on mickey. I believe I connected the interfacing to the black fabric, peeled and then added to the onesie
- do the same for the "2"
- I tied the smaller size grossgrain ribbon in two separate bowes and hot glued them to the end ofthe sleeves.
- I made a bow with both sizes as i did with the hair clips and hot glued to the top of "mickey"

SO here is the outcome of the invite...
Wording: From the tip of her tail to her polka-dot bow, she's the cutest little mouse that you'll ever know!
Gracie xxx's turning 2! She wants to celebrate with You!
Come to Gracie's Clubhouse on xxxx
The invite was glued in the red polka dot card (found a pack at Joann's or Michael's of red blank polkadot cards). I cut the Mickey silhouette again from the cricut. Thank-you card was folded over. I glued just the top of the silhouette and tucked the card in to hold the fold.

Thank-you wording: We giggled, we played, we ate, we had fun!
Now I can say I'm NO longer One!
Minnie thanks for making my 2nd birthday so special! xoxo, Gracie
Okay lets get started:
decorations/food/etc... (I'll take you around the party):

 the paper to the left was for all the guests to sign (in case you haven't guessed I also LOVE to scrapbook, so this is a cute addition to Gracie's birthday scrapbook). I found a pack of various color polka-dot cardstock and used that for "Minnie's Bow-tique". I also used my cricut for the banner and sign in paper. here's where the various colors of polka-dot ribbon came in handy. Each placing on the tables had Mickey ears as a favor for each child and all the girls got to visit "Minnie's Bow-tique" and pick out their bows. to the right of the table I made open boxes using black card-stock, the larger red gross grain ribbon and mickey silhouettes. there were a couple boxes that I used the front (polka-dot side) for the "Minnie" favors and the back (flat red side) for the "Mickey" favors. I hot glued the Mickey and Minnie silhouettes to the coordinating boxes. the favors were Minnie and Mickey crayon rolls. I wish I had a better picture of them... sorry.
 here's the directions (read before shopping so you know what to get and expect):

- Cut two strips of black felt using the height of a crayon (plus about 3/4") x 8" wide.
- for Minnie use red/white polka dot fabric, for Mickey use red fabric or red felt (felt works better). cut one strip of the Minnie or Mickey fabric the same size as a black one. use red and red/white polka dot gross grain ribbon for the tie (about 12")
- line up the black peices back to back and pin, fold the ribbon in half and tuck the fold into one of the shorter sides, the ribbon is what you will use to tie around the crayon roll once its rolled. (if you are using flat red felt ie: Mickey, then use red ribbon, same for Minnie with polka dots)
- sew along entire edge with black thread.

- place a strip of the red felt/fabric along the bottom of one side of the black felt, pin and sew along the top of the red strip (going down the middle of the black peices) with red thread.
- now flip over place the other red strip on the same side as the previous red sewn strip. pin holding the other red strip up so it is NOT pinned and sewn together (making a flap). Now sew along the short sides and bottom long side with red thread, making a pocket on the latter side.
- Using crayons to measure with of individual pockets, sew several lines from the bottom red line straight up making several individual crayon pockets.
- now flip over again and sew down the flap along the same short sides and bottom long side as the other red peice.
- Almost done... fill pockets with crayons, roll and tie. if mickey (flat red felt) hot glue to white buttons in the middle to look like Mickey's pants...

Now for the treat table. Candy bars Rock because older kids and adults get to leave with goodies too!
 I kept the color scheme ONLY red, black and white candy such as red/black licorice, red mints, i ordered red/white swirly lollypops from www.orientaltrading.com, yogurt raisins mixed with craisins, red/white M&Ms (i actually saved from Valentine's day...check expiration ;o)
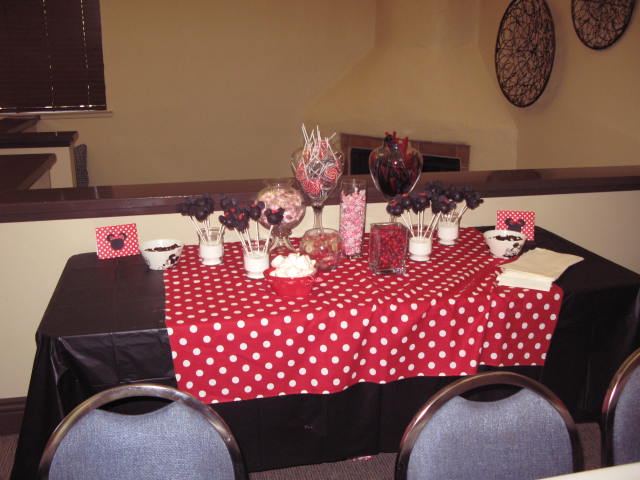 The cake pops were actually a lot easier than I thought they'd be and turned out so cute and professional looking. I made the usual cake pop (I think I used cherry-chip cake with cream cheese frosting) dipped in black chocolate melts (i had to order online at www.wilton.com) I set aside another bag of black chocolate melts for the ears. they come in circular disks so i cut out a very small crescent shaped sliver on a side of all of them so the ears would fit along the cake pops and stuck them together with some of the melted chocolate after the cake pop was cool. I made bows out of red fondant that i made and set aside from Gracie's cake for the Minnie ones. I just used white sugar in vases to place them in as shown below. the bags were just white paper bags and I made cute sticker labels on the computer. (as shown below) I think it said something like "Minnie thanks for coming..."

Here's the super cute banner made with the cricut. (BTW I can make a similar banner, or any of the decorations for your little one... just email me email at bottom for pricing)


Now for the tables...

- ears as noted above at each place setting...
- I found packs of Minnie and Mickey stickers at the party store.
- I printed Mickey , Minnie and the gang coloring pages from the web
- I bought small blank note pads in rectangle and heart shapes (perfect to go along with crayon rolls) and for kids to decorate with the stickers
- i used small wide mouth mason jars to hold crayons as shown to the right
- each table had several snacks as well
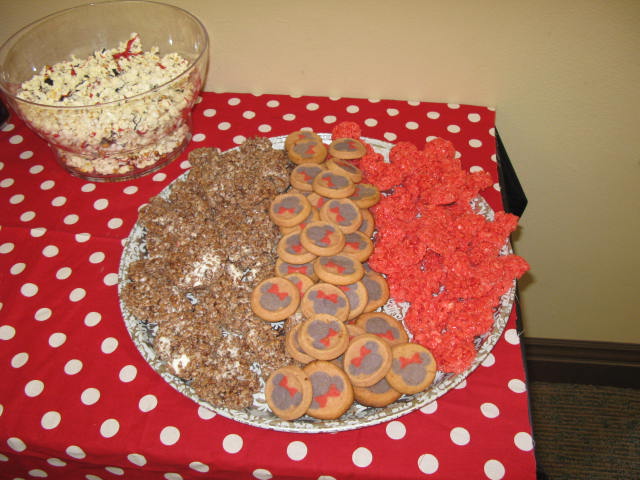
- my world famous party popcorn (drizzle popcorn with Wilton candy melts in the colors coordinating with the party) I make this for every party and its a hit! (I made it as one of the popcorns for the Dumbo shower)
- I used a small Mickey Mouse shaped cookie cutter to cut flat bread and placed in bowls with hummus shown below
- cherry puffs


food:

- Costco has Mickey shaped chicken nuggets. I cooked those prior and placed a ton in a large crock pot to keep warm
- I used the mickey shaped cookie cutter to cut watermelon
- I made a Mickey Mouse "Club" house sandwich bar cutting the bread with larger Mickey mouse cookie cutter along with various meats, cheeses, veggies, etc... for guests to build their own sandwiches
- I made chocolate rice crispy treats and regular rice krispy treats with red food coloring and cut them with the mickey shaped cookie cutters
- the minnie cookies were actually Pillsbury seasonal cookie dough for Valentine's day that i bought and froze at that time, knowing i was going to have a Minnie bday for Grace
- the cupcakes were made with the leftover fondant with flat red liners (for Mickey) and polka dot red liners (for Minnie) you can find that at Michael's
- CAKE: I found a fondant recipe online at www.allrecipes.com. I used the Mickey cookie cutter for the Silhouette... I realized later that I forgot the bow for Minnie but it still turned out cute. I put fake pearls along the bottom

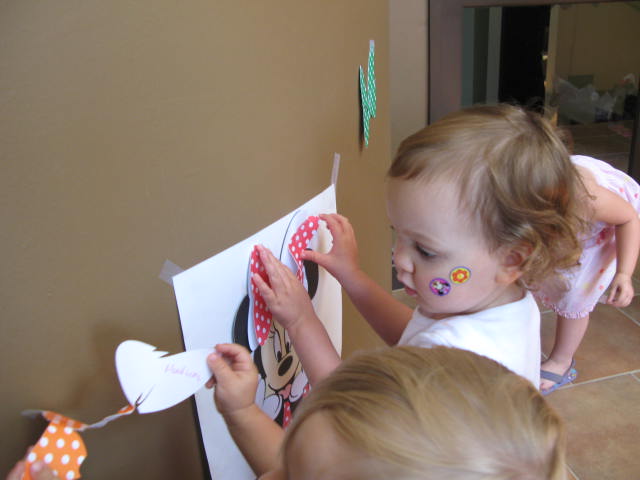
And here's the little princess...

Games are difficult at this age but this one was definately worth the photo opp.
 If you havent figured out its "pin the bow on Minnie" c/o my wonderful Cricut
There was another "play room" where I found Mickey Mouse clubhouse play tent from toys r us (including a tunnel and ball pit) and all our Mickey and friends toys/stuffed animals set up in that room. The outside patio had bubbles (I also found Mickey and Minnie bubble sets at the party store)
Happy Birthday Gracie Mouse!!

Again, if you are interested in any of the items shown or more ideas (of course I am NEVER able to put together everything that is in my head in time) please feel free to email me: c_n_rener@yahoo.com
Thanks!!!