Monday, September 9, 2013

Gracie's 3rd {Snow White} inspired birthday party

 
The Princess phase has officially set in... I'd say about 2 1/2 years old... well, surprisingly my daughter takes a major liking to one of the freakiest princess movies there is out, Snow White... (she was bobbity-boo ie: Cinderella for Halloween so we've moved a little past that (although, that may just be her all time fave). So, the frugal mommy I am, saw that the Snow White dress at the Disney Store (can I say that online??) anyways, while gorgeous, was WAY overpriced for our budget which ='s mommy sewing time :) see the post on the dress http://colectinggrace.blogspot.com/2013/09/gracies-snow-white-dress.html 
 
Ta-daaaahhhh
 
 
The minute Gracie put on her "Snow White" dress, she decided she wanted a Snow White birthday, yep she reminded me about 250 times before the party, just to make sure... (she'll make a great wife one day...)
 
First things first... PINTERESTTTTT. Here's my board: http://pinterest.com/missrener/gracies-3rd-snow-white-birthday/ 
 
For this party we happened to be moving, so I ended up doing an e-vite and combined the "Going away" with Gracie's b-day... double whammy whoop-whoop (not to mention we've only been there for less than a year, so it would be the same crowd)
 
First of all can I just say, when I start selling my stuff I'll be able to justify a photographer, for now you'll have to deal with my "I'm running late, last minute quick snapshots"... okay continue... 
 
I think the banner was first... let's bust out my favorite toy THE CRICUT: (it is INCREDIBLE what you can do with paper, a cricut, glue and a little imagination....)
 
You can see the banner hanging (cut off sorry) and the other banner barely... the first "Happy birthday Grace" font, sideways... sorry... is done with the Nursery Rhymes cartridge http://www.cricut.com/home/search-results?searchquery=nursery%20rhyme; the apple with "3rd" is from the Happily Ever After Cartridge (where all the Snow White, Apple and dwarf cut outs are from). http://www.cricut.com/home/search-results?searchquery=happily%20ever%20after
 

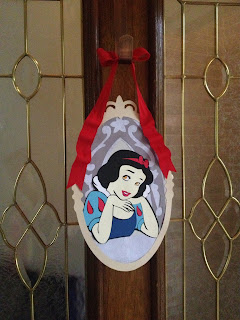
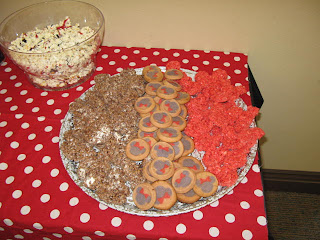
you can barely see but if you look closely under the "h" I made paper mine carts and used the 7 dwarfs symbols on the side... all i did was fold a peice of grey cardstock into a box, put black circles as the wheels and around and the circle lable one with a lantern, a pick ax and a jewel (=three carts). I filled those carts with cupcakes covered in frosting, then crushed graham crackers and jewel candy we made from a mold at Hobby Lobby. I bundled sticks in mason jars (tied with twine and paper apples hanging) with the apple symbol on the front in front of red/white polka dot ribbon wrapped around. I put her snow white little people toys all over that for decoration. the Snow White was hanging on the front door below. The evil queens table to the right says "Poison Apples" on the sign. I actually used a Harry Potter font I found online and printed the letters quite large. I cut them in penent shapes and put purple and silver cardstock as backing with the apple symbol between. above it are purple and black tulle puff balls hanging and purple tulle across. Its a carmel apple bar (hence the crock pot) there were about 10 bowls with different toppings (crushed M&Ms, crushed Oreos, coconut, chocolate chips, crushed graham crackers, you name it.) we unwrapped about 4 bags of caramels with a little water in the crock pot. It was a total hit! SO yummy! that table also had apple looking cupcakes and apple cakepops (as shown below)


apple cake pops made the night before placed in rice in a cauldron
for the "Poison Apple" table


Here are more decorations and tables...


kids table covered in brown postal wrapping paper, red burlap crossing,
red yellow and blue (diff shades of blue doilies) cut with the cricut
each guest recieved a whistle as shown below, a burlap bag for their
"heigh-ho" mining jewels, bubbles, a red headband or dwarf hat
 

you can see the paper apples hanging from the patio cover
snacks (nutella and apple slices)


Here are visual directions to the dwarf hats... (all the boys got dwarf hats and the girls got red ribbon headbands)
 
cut a yard in half
fold a cut in half


sew a curved diagnal line from folded tip to other tip


should look like this
cut along outside of curve 

turn inside out


Tah-DA!!!


the "heigh-ho" mine all the dwarfs in the grass with sticks in the tent as shown below were
rocks we made (as shown below) around plastic "jewels" from the craft store (hobby lobby or michaels)


here's the kids "panning" for jewels (I just punched holes in cheap aluminum pie tins)

Here's a visual tutorial of the burlap bags the kids put their "heigh-ho" mine jewels in.
cut burlap fabric in rectangles depending on size you want
(mine were about 12 x 8)

 
fold in half and sew along the edge and bottom
(leave open top)


see


fold over top about 2" and sew along so you can string through
to make a drawstring
like so


I found a nest tutorial on pinterest and these cute warbling bird whistles really cheap (ha ha get it) online. (they're the kind you dip in water to make bird sounds)

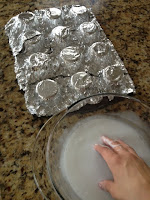
1) cover a muffin tin in foil, upside down
2) fill a bowl with equal parts, glue and water
3) take strips of paper (I used leftover from the banner) and soak them in solution
4) cover tops of muffins with strips
5) let dry (took about 3 days!!!)  and carefully peel off nests


Here's the kids making the "mining rocks" recipe here: http://www.sewcando.com/2010/04/diy-treasure-stones-tutorial.html
(MAKE this and nests a week to a few days ahead as they take a while to dry)


Okay, I'm getting tired... here's random pics and captions throughout the party...
 

Gracie blowing candles to her "gooseberry pie" I just baked a cake in a pie dish, smothered strawberry jelly
criss-crossed light brown frosting and voila


Here's a game we played... "pin the tissue on Sneezy's nose" I actually used stickers attached to a tissue. the kids that weren't too freaked out to have a blindfold enjoyed it!


~Happy Birthday Princess!~
 
PS: A special thanks to my WONDERFUL and patient Hubby and my friend Nicole (there is NO WAY I could have pulled this off without you!!!! (without tears...)
 
if you're intersted in further details or purchasing any of my banners, etc... feel free to email me at colectingGrace@yahoo.com


Gracie's Snow White dress

So I'm a little new to the "sewing your children clothes world". I have had my sewing machine for about 7 years give or take, perhaps its time for a new one... (hint hint hubby if you're reading this.........) I've made a lot of baby blankets, burp cloths, nursing covers, etc... easy no pattern necessary stuff... however now that my "little princess" has decided she actually is a princess and thus should dress like one (every...single...day) I've reverted to the I'm too cheap to pay $45 at the Disney store so I'm just gonna make one model...

I have to say I was actually quite pleased with my first attempt... as this is WITHOUT a pattern (sorry ladies no pattern here to share) the zipper is WAY off center but it came out cute and Gracie's happy!

this is based on her measurements... no pattern

If you want step by step instructions let me know... it was just a bunch of leftover fabric I had. You may recognize the Snow White fabric from the apron I made Everly (using scraps makes me happy too!) http://colectinggrace.blogspot.com/2013/02/evees-snow-white-apron-and-dolly-one.html

If you're interested in step by step instructions let me know colectingGrace@yahoo.com

It would be a REALLY long blog if I put them here.. I tried to post as many detailed pics as I could below...

If you don't sew, check out my etsy:
https://www.etsy.com/shop/ColectingGrace?ref=search_shop_redirect


Monday, July 29, 2013

Gracie's 2nd "Minnie Mouse" Birthday

If you have a 2-year-old you understand Mickey and Minnie as a regular household name (or word of demand whenever the TV is on or you're in the store from your little one). I'm still blown away that Gracie at 1 1/2 - 2 years old could point out a mickey logo/silhouette antannae ball from 20 cars away in any given parking lot... by the time she was 1 1/2 it was determined Minnie would be the perfect thing for our little mousketeer! That being said, the planning commenced...  
 
As always I got various ideas online for the party and "pinned" away (not sure if the link will work but it's worth a shot)
 
 
before I could get the invite out, I needed pictures... I love using the kids own pictures if at all possible.
 
Outfit:
- ears & bow (worked out great because they ended up party favors... see later). 

- clothes
  • materials:
    • regular white t-shirt onesie pack (just need one)
    • both sizes gross grain ribbon in red/white polka dot
    • black fabric
    • mickey silhoutte template (I used my cricut cartridge to create one) I used this cartridge for pretty much EVERYTHING at the party http://www.cricut.com/Shopping/detail--Disney-Mickey-and-Friends-Cricut-Cartridge-0-122.aspx
    • red/white polka dot fabric and "2" template (I used my cricut again)
    • tutu (I bought this one at gymboree as part of the ladybug collection) but there are plenty of tutu tutorials online (you could use  fabric glue and the smaller red/white polka dot grossgrain ribbon to line the tutu)
    • double sided iron-on interfacing for the applicae  
  • I used the mickey template over the black fabric to trace and cut the mickey, repeat on the double interfacing. follow interfacing instructions to iron on mickey. I believe I connected the interfacing to the black fabric, peeled and then added to the onesie
  • do the same for the "2"
  • I tied the smaller size grossgrain ribbon in two separate bowes and hot glued them to the end ofthe sleeves.
  • I made a bow with both sizes as i did with the hair clips and hot glued to the top of "mickey"
I found a Mickey Mouse and Disney font online. Just search "free Mickey Mouse fonts" wording. I also found the Mickey silhouette and polkadot background online and put it together using word and photoshop.

SO here is the outcome of the invite...

 Wording: From the tip of her tail to her polka-dot bow, she's the cutest little mouse that you'll ever know!

Gracie xxx's turning 2! She wants to celebrate with You!

Come to Gracie's Clubhouse on xxxx

 The invite was glued in the red polka dot card (found a pack at Joann's or Michael's of red blank polkadot cards). I cut the Mickey silhouette again from the cricut. Thank-you card was folded over. I glued just the top of the silhouette and tucked the card in to hold the fold.

Thank-you wording: We giggled, we played, we ate, we had fun!
Now I can say I'm NO longer One!
Minnie thanks for making my 2nd birthday so special! xoxo, Gracie


Okay lets get started:

decorations/food/etc... (I'll take you around the party):

the paper to the left was for all the guests to sign (in case you haven't guessed I also LOVE to scrapbook, so this is a cute addition to Gracie's birthday scrapbook). I found a pack of various color polka-dot cardstock and used that for "Minnie's Bow-tique". I also used my cricut for the banner and sign in paper. here's where the various colors of polka-dot ribbon came in handy. Each  placing on the tables had Mickey ears as a favor for each child and all the girls got to visit "Minnie's Bow-tique" and pick out their bows. to the right of the table I made open boxes using black card-stock, the larger red gross grain ribbon and mickey silhouettes. there were a couple boxes that I used the front (polka-dot side) for the "Minnie" favors and the back (flat red side) for the "Mickey" favors. I hot glued the Mickey and Minnie silhouettes to the coordinating boxes. the favors were Minnie and Mickey crayon rolls. I wish I had a better picture of them... sorry.

here's the directions (read before shopping so you know what to get and expect):
  1. Cut two strips of black felt using the height of a crayon (plus about 3/4") x 8" wide.
  2. for Minnie use red/white polka dot fabric, for Mickey use red fabric or red felt (felt works better). cut one strip of the Minnie or Mickey fabric the same size as a black one. use red and red/white polka dot gross grain ribbon for the tie (about 12") 
  3. line up the black peices back to back and pin, fold the ribbon in half and tuck the fold into one of the shorter sides, the ribbon is what you will use to tie around the crayon roll once its rolled. (if you are using flat red felt ie: Mickey, then use red ribbon, same for Minnie with polka dots)
  4. sew along entire edge with black thread.
  5. place a strip of the red felt/fabric along the bottom of one side of the black felt, pin and sew along the top of the red strip (going down the middle of the black peices) with red thread.
  6. now flip over place the other red strip on the same side as the previous red sewn strip. pin holding the other red strip up so it is NOT pinned and sewn together (making a flap). Now sew along the short sides and bottom long side with red thread, making a pocket on the latter side.
  7. Using crayons to measure with of individual pockets, sew several lines from the bottom red line straight up making several individual crayon pockets.
  8. now flip over again and sew down the flap along the same short sides and bottom long side as the other red peice.
  9. Almost done... fill pockets with crayons, roll and tie. if mickey (flat red felt) hot glue to white buttons in the middle to look like Mickey's pants...
they turn out super cute and my daughter still uses hers. perfect for throwing in a diaper bag or moms purse to keep occupied at a restaurant.

Now for the treat table. Candy bars Rock because older kids and adults get to leave with goodies too!

I kept the color scheme ONLY red, black and white candy such as red/black licorice, red mints, i ordered red/white swirly lollypops from www.orientaltrading.com, yogurt raisins mixed with craisins, red/white M&Ms (i actually saved from Valentine's day...check expiration ;o)

The cake pops were actually a lot easier than I thought they'd be and turned out so cute and professional looking. I made the usual cake pop (I think I used cherry-chip cake with cream cheese frosting) dipped in black chocolate melts (i had to order online at www.wilton.com) I set aside another bag of black chocolate melts for the ears. they come in circular disks so i cut out a very small crescent shaped sliver on a side of all of them so the ears would fit along the cake pops and stuck them together with some of the melted chocolate after the cake pop was cool. I made bows out of red fondant that i made and set aside from Gracie's cake for the Minnie ones. I just used white sugar in vases to place them in as shown below. the bags were just white paper bags and I made cute sticker labels on the computer. (as shown below) I think it said something like "Minnie thanks for coming..."


Here's the super cute banner made with the cricut. (BTW I can make a similar banner, or any of the decorations for your little one... just email me email at bottom for pricing)


Now for the tables...
  • ears as noted above at each place setting...
  • I found packs of Minnie and Mickey stickers at the party store.
  • I printed Mickey , Minnie and the gang coloring pages from the web
  • I bought small blank note pads in rectangle and heart shapes (perfect to go along with crayon rolls) and for kids to decorate with the stickers
  • i used small wide mouth mason jars to hold crayons as shown to the right
  • each table had several snacks as well
    • my world famous party popcorn (drizzle popcorn with Wilton candy melts in the colors coordinating with the party) I make this for every party and its a hit! (I made it as one of the popcorns for the Dumbo shower)
    • I used a small Mickey Mouse shaped cookie cutter to cut flat bread and placed in bowls with hummus shown below
    • cherry puffs


food:
  • Costco has Mickey shaped chicken nuggets. I cooked those prior and placed a ton in a large crock pot to keep warm
  • I used the mickey shaped cookie cutter to cut watermelon
  • I made a Mickey Mouse "Club" house sandwich bar cutting the bread with larger Mickey mouse cookie cutter along with various meats, cheeses, veggies, etc... for guests to build their own sandwiches
  • I made chocolate rice crispy treats and regular rice krispy treats with red food coloring and cut them with the mickey shaped cookie cutters
  • the minnie cookies were actually Pillsbury seasonal cookie dough for Valentine's day that i bought and froze at that time, knowing i was going to have a Minnie bday for Grace
  • the cupcakes were made with the leftover fondant with flat red liners (for Mickey) and polka dot red liners (for Minnie) you can find that at Michael's
  • CAKE: I found a fondant recipe online at www.allrecipes.com. I used the Mickey cookie cutter for the Silhouette... I realized later that I forgot the bow for Minnie but it still turned out cute. I put fake pearls along the bottom

And here's the little princess...


Games are difficult at this age but this one was definately worth the photo opp.


 If you  havent figured out its "pin the bow on Minnie" c/o my wonderful Cricut


There was another "play room" where I found Mickey Mouse clubhouse play tent from toys r us (including a tunnel and ball pit) and all our Mickey and friends toys/stuffed animals set up in that room. The outside patio had bubbles (I also found Mickey and Minnie bubble sets at the party store)

Happy Birthday Gracie Mouse!!  


Again, if you are interested in any of the items shown or more ideas (of course I am NEVER able to put together everything that is in my head in time) please feel free to email me: c_n_rener@yahoo.com

Thanks!!!


Saturday, March 23, 2013

Toddler time 1: Rainy Day fun!

I'm always looking on Pinterest or online for fun stuff to do with my little girl. I have a bunch of snack and art project ideas (motor skills) that I want to do and have done, so I'm starting a "Toddler Time" highlight to my posts... (trying to organize or make it easy to find stuff...)

This one's pretty simple... it was a rainy day (surprise, surprise...) so I thought we'd make a raincloud.

Ingredients:
- clear fishing string (wire)
- styrafoam or paper bowl
- blue construction paper
- pencil and kid scissors

I folded the paper in half short ways and drew bunch of LARGE raindrops on the blue construction paper (about 2 1/2 inches long). I had gracie cut them with the kid scissors (with my help of course)

----- we interupt these instructions for a very important motor skill message --- before using kid scissors together, we sing "twinkle twinkle" doing the open shut (twinkling) motions with our hands. It helps her get the cutting motion prepped for using scissors
-------------

and we're back.... so, because the paper was folded you should have a bunch of raindrops that are in pairs (same size pairs). put those aside... then I flipped the bowl over and punched a bunch of holes in the bottom with the pencil. I cut several strips of fishing string in diffenent lengths and had her pull the sting through the holes (**motor skills**). I tied off the fishing wire in a big enough knot that it wouldnt untie or go through the holes i punched (You can burn the knots to make sure they stay but I wouldnt recommend doing this NOT in the prescense of your lil one or they may get some early pyrotechnic ideas... anyways, we took a pair of raindrops on the other end of the string (below the bowl) and glued them each together around the sring. continue with all the raindrops and pull a string through a hole in the middle of the bowl and knot it the other way to make a hook for it to hang... if that makes sense, use that string to hold up or hang your raincloud...

remember to be patient, the raindrops are going to get messed up, you may have to help your little one glue the paper together (not their fingers) and they may only have the attention span to do a couple raindrps... and you'll have to come back and finish after snack...  but the more they're doing on their own (in a SAFE way), the more they're learning...

Thursday, March 21, 2013

Baby Charlotte's Dumbo-Circus Shower

So my BFF back home in Cali, Erin, LOVES Disney. For her shower, I wanted to do something that had a Disney theme to it, but not too overdone or cheesy, kind of a side theme/character, and not just random Walt Disney threw up in the room... you catch my drift...

So I was shopping at Target and what to my wondering eyes appear, but the cutest set of Dumbo onesies... for a girl (we didn't know what she was having at the time, but this was perfect!) and became my base for the shower/color scheme... of course I had to wait until she found out she was having a girl... I decided to go with the circus theme either way. if a boy, i'd do primary colors, if a girl I'd do the colors on the onesies... (here's a pic) 


Once she found out she was going to have a "Charlotte" we could move forward on invitations, decorations, etc... (color scheme is Everything people...)

Everything just seemed to fall into place, its like these stores knew exactly what was in my head... (Or it could be divine intervention, my Jesus knows nothing brings me more joy than when things match... okay, maybe not "nothing"). So I found one of those scrapbooking paper packs you can get at Michael's or Joann's that had a "circus" look to it (I think its called "Nana's cookies") and the colors i wanted. I used a lot of paper for the decorations.

anyways, here's what i did with the shower...

I only have the three pics you can see there. i'm waiting for Erin's cousin to send me more... (TIP #1 --- I don't care how Stressed you are, don't forget to take pics!!!!...like I did...whoopsie)

ONE tip: DONT throw away ANY paper... you'll see why in "decorations" section

INVITATION: Invites came out really cute! I found fonts online (they were all free fonts you can google free X font)

I used:

- Circus
- Hoedown
- Columbus
- Edwardian Script
- Rage (you'll LOVE this one!)

The pic of Dumbo was from the onsie. i literally scanned the pics of the mouse and Dumbo (attached)


I'm not sure how to attach word doc here... sorry about that..

Okay so here are the steps to creating the invitation you see above:
  1. Create the template on word by inserting a triangle shape above a rectangle... (click insert, then the shapes icon)...in the shape of a circus tent and print that on plain cardstock (get a pack of cardstock sheets that are in the same color scheme) that matches the patterned paper you choose) then cut out your tents (SAVE SCRAPS OF THE FLAT COLORED PAPER)
  2. Print the invite wording only (rectangle you see above) on white canvas cardstock (about four should be able to fit into one page) MAKE SURE EACH RECTANGLE OF THE WORDING IS SMALLER THAN THE TENT RECTANGLE ON EACH SIDE BY ABOUT 1/4 INCH  
  3. trace a circus tent you've created on the BACK of the patterned paper you want to use for the tent.
  4. cut out your "circus tents" on the patterned paper. use a ruler or blade ruler combo to cut a line separating the triangle and rectangle parts of the circus tents on the PATTERNED PAPER ONLY.
  5. Glue the invitation wording in the rectangle part of the flat colored circus tents  
  6. use the scraps of the patterned paper to create small diamond shapes about 1 inch wide.
  7. fold the diamonds in half around a toothpick and glue to create the pennent flag that will at the top of the invitation
  8. Glue the patterned triangle tops to the top part of the flat colored circus tents (line up on top to make sure you can't see edges) with the other end of the toothpick flag sticking out of the top to create the tents flag.
  9. Cut the rectangle in half (short ways) on the patterned paper. This is how the tent will open in the middle.
  10. glue the edges of each side of the rectangle bottom part on the sides of the invitation wording (in the 1/4 inch gap on each side). and fold them at the edge of the invitation wording paper to make the "doors or curtains"
  11. Use the scraps of the flat colored cardstock to create the scalloped roof edges of the circus tent with my cricut but you can use textured scrapbook scissors too.
  12. I used my cricut with the scraps of the patterned paper to make "tags" (plantain schoolbook cartridge) and then printed the tag wording on the same canvas white cardstock as the invitation wording.
  13. Cut the wording for the tickets to fit on the patterned paper tickets and glue them on.
    TICKET WORDING: on the top i put entr'acte (like intermission) with the wording below reading:
    Pregnancy can often make you feel like a clown
    Please send a funny anecdote, short story, craving,
    anything extraordinary about your
    pregnancy or your mothers pregnancy
    with you to INSERT EMAIL ADDRESS HERE>>>>>>>>>>
the other ticket said:
Come one come all on the side (with word art) and the wording on the other side read: "test your luck at our diaper raffle 1 pack = 1 ticket (I used regular raffle tickets from smart and final for this)

I wrapped string (the same floss used for making friendship bracelets) around the invite a few times, put the tags through and tied in a cute bow shape to finish it off.

 
I found circus looking fabric with the same color scheme along with stripes and polka dots for the diaper cake (as shown in pic above) MESSAGE ME for special orders on diaper cakes, banners and decorations...  the little pennent on top had the letter "C" of course for miss Charlotte


DECORATIONS:

Banner: you can see in the photo's attached the banner I made. i used the circus font large to write welcome and the "Lil' Peanut" was in pennents... behind the banner is just plain ol' party streamers... we taped them to the top of the window blind thingy and let them hang in stripes.

I used scraps of paper to cut out pennents (diamond shapes folded over string to make triangles) and used the same string (floss) i used on the invites to hang pennent bunting all over (you can see a little bit of it on the diaper cake table photo attached) i hung the bunting from light fixtures across too so it was over the guests...

 Tables: i got cheapy white plastic table cloths (2 for $1 at Wal-Mart) and draped different colors of tulle over them like runners turned out really cute (you have to fold it in half long ways to really see the color). you can buy this by the yard at JoAnn's (its like 1.25 a yard).

 I used more paper scraps and cut them in strips (big or small) and wrapped them around a pencil (white side against pencil) pull the pencil out and viola you have little curly/twisty confetti's to put on the tables... add's more fun and color. I also used peanuts as decoration all over the tables (since it was an adult shower i didnt have to worry about kids with peanut allergies. you can get those marshmallow peanut candies (i think they're called circus peanuts) to be safe... (or use that as a treat)

I also got a roll of raffle tickets at smart and final and used these for all sorts of decorations. you can wrap them around glass for treats, or just curl them like the paper and put them on tables... its really a cheap decoration.

I found vintage pics of Dumbo from Disneyland (as you can see in the photo) and printed them large as decoration. (if i had more time/$$ i would have framed them in cute thick white frames... and matted with different bright color paper) it's on my pinterest

 I used Starbucks frappe bottles and decorated them with a strip of the cute paper wrapped around and covered the front with a circle that had each letter of Charlottes name printed in Rage font with a color paper behind the letter scalloped. I lined this up but meant to stack it up like a bean bag toss game you play at an actual circus... (You could find plastic bottles in a similar shape to use as an actual game at the party...

I wanted to do a photo booth and got some accessories to do it but we just didnt do it for some reason: I attached the clown stuff to do it. I framed the clown around doc (attached) and had a basket of fun "dress up" stuff... feather boa, beads, clown nose, silly glasses, etc... you can leave a disposable camera with the stuff and have people throughout the party go take their own silly clown pictures. I also attached a doc with mustache, lips, etc... print, cut and tape or glue these to cake pop sticks for people to hold up when taking hte pics.

I used a cute prego pic of erin and wrote in cute fonts with word art so it looked like a circus poster "come see the Ever-Expanding woman" I'll try to find it to post

I found a copy of Dumbo and had the guests all sign it for baby Charlotte.

We also did the scrapbook thing as with the Queen of Hearts shower previously posted. I found a themed (matching with color scheme) scrapbook, embellishments, string, paper (same as ones for invite and decorations), scissors, etc... to go with the theme and set it out on a separate table for the guests to create a pre-made scrapbook for Erin to place the baby pics in... such a fun project, comes out so so cute with everyone's personalities...

for food we just did a salad/sandwich bar and i found these cookies that look like striped straws that are pink and white at smart and final, i think they're an asian thing, but they were really good, i think they had other colors too.. for the drinks i found striped paper straws on etsy and used mason jars. (and of course pink lemonade). I printed the guests name on little sticker labels and they put their name sticker on their mason jar. for a kids party i would have more fun with food and decorations... you can cut sandwiches or just bread and make a sandwich bar in star shapes with cookie cutters... definately have bananas for the monkeys ... maybe cotton candy (Brennon has a cotton candy machine), candy apples...

take home/favor: i found cute chevron striped paper bags on etsy in the colors that matched the party and made a cute sticker saying somehting like She's gonna "pop" corn... and had different flavors of popcorn in apothacary jars (popcorn bar) one of my fav's is get chocolate candy melts from joann's or michaels in the colors your doing the party in (or white and make the colors with food coloring) and drizzle the melted chocolate over regular salted popcorn. (I like to make my own airpopped or in a pot the old fashioned way and use sea salt. you can have fun with the flavors, drizzle melted caramel... ) cheap and yummy favor. For a birthday party or bridal shower you could say something like "thanks for {pop}ping by to celebrate XXX's special day"

If i were doing a circus birthday party I'd do different "stations" or areas of the place and place different homemade circus games... It's really amazing what you could make with a little imagination and home depot or lowes

a flat square peice of wood drilled with several holes place wood dollops in holes and glue with wood glue, paint and voila you have a ring toss (you could get those glow stick necklaces from the party store as rings to make it more fun

you could do a bean bag toss, (bean bags are so easy to make if you have a sewing machine and you could get fabric that matches the party colors)

knock over the bottles like above with bean bags...

I always like to do some kind of art project or activity. you could get masks from oriental trading and have kids decorate with sequins, feathers, and such... also, oriental trading you can buy bulk of little stuffed animals really cheap and give those as prizes to the games... or a really cheap and fun prize is getting glass bowls from the dollar store those colorful glass stones from michales (you can also get in colors to match party) and put a gold fish in it... (not sure how happy parents will be but its totally in tune with the theme...haha)

I'm not sure how much a balloon person is but that would be a fun take-home along with popcorn and that's it...
 
Love you Erin, hope this shower was truly memorable! glad I could be a part of Welcoming precious little Charlotte!!!
 
Here's Erin and I (and yes, i purposely wore a sundress to match... I'm a nerd, I know...)